25 August 2010
This is an incremental tutorial to Brian Gerkey's tutorial a few years ago called Mapping with the iRobot Roomba, which explained how to do offline map-building using the Player development environment on a Gumstix board. Our group at Duke used the ROS Robot Operating System running on an EEEPC Netbook to do SLAM and Global Navigation. This page will explain how to get these up and running on our environment and will give some videos / results.
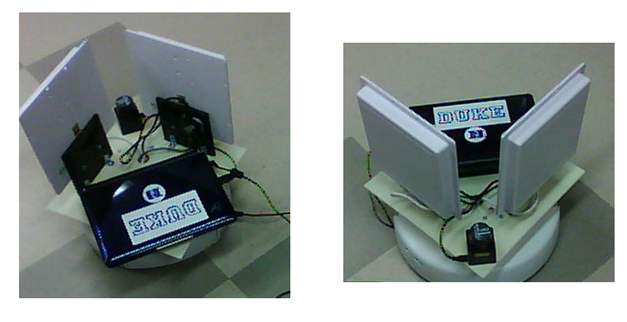
Note: The robot platform is also set up with two RFID antennas, which I will mention for completeness, but no RFID techology is required for the map building and navigation capabilities presented in this tutorial.
The 4 USB devices (the IRobot Create, the USB webcam, the Hokuyo urglaser, and the RFID reader) were all connected to the USB hub, which was plugged into a single port on the netbook. It was convenient to use udev to link the USB device aliases to constant names. This way, the aliases wouldn't be switched every time the devices got unplugged, and it was easier to make ROS launch files without having to change the port IDs for the different hardware devices. Click here to view the udev file that I made for the devices.
The Hokuyo and the webcam are powered by the netbook's battery via the USB ports. The RFID reader needs 5V and is powered externally by the iRobot Create's battery. To accomplish this, I attached a 16V to 5V stepdown converter to a plug that plugs into the iRobot Create's expansion bay (shown below)
With the Hokuyo running, the netbook's battery life is reduced to about 3.5 hours. I always unplug the Hokuyo and the RFID reader plug before charging to charge the robot and the netbook more efficiently.
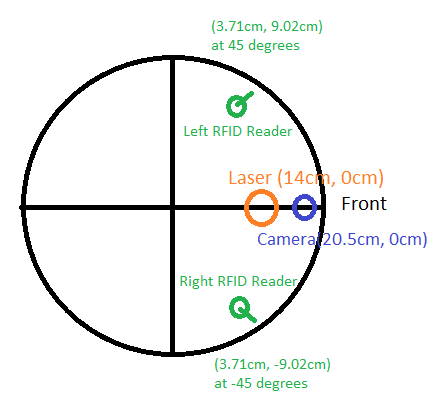
I used ROS's built-in TF Transformation system to specify the orientation of all components with respect to the robot base (which are static on this platform). The position and orientation of the components are as follows:
A 1 square foot plastic platform is mounted on the create 13cm above the ground in a diamond formation (with corners at the front and back of the IRobot Create)
The Hokuyo laser is centered 14cm in front of the center of the platform facing forward
The USB camera is positioned 20.5cm in front of the center of the platform and 3.5cm to the left of center facing forward.
The two RFID readers are placed symmetrically to the left and right of center, each facing 45 degrees away from center
It is important to specify these transformations as accurately as possible so the map-builder can rectify the offset from the center of odometry. The static transformations described are specified at the bottom of this configuration file (note that the rotations had to be specified as quaternions). Click here to see the format for specifying static TF transformations.
Click here to see the TF transformation tree printed from ROS during runtime.
I communicated with the robot through Duke's wireless network primarily using remote desktop. I used both Ubuntu's built-in remote desktop server and TightVNC to clone additional GNOME desktops. There was some lag but it was still possible to program and set off launch files.
One thing to note is that running RVIZ, an important visualization program that's used both for map building and navigation, requires GL extensions. This means that it can't be run through one of the :1, :2, :3, etc. TightVNC virtual desktops; it has to be run on the actual desktop that is being displayed on the screen (Ubuntu's primary remote desktop server).
The first step is to install the ROS base system onto Ubuntu 10.04 following these instructions. I used the ros-cturtle-pr2all option. Then there are three additional third-party packages that need to be installed. Download each one and place it in some directory where ROS can find it (type roscd to get to the root of ROS), and then type rosmake [package name] to build:
The Brown irobot_create_2_1 ROS package built over the iRobot Create Open Interface. This package has a node that serves as a communication driver for the Roomba. It subscribes to the cmd_vel topic which is of type Twist. This means that it can directly actuate drive commands sent from the navigation stack that are specified in meters/sec and radians/sec. Visit this link for more information on the drive commands sent from the navstack.
Another nice feature of this package is that it keeps track of odometry information and publishes the TF transform from odom to base_link automatically, so I didn't have to write my own node to keep track of odometry
Install the package irobot_create_rustic. This is another driver package for the iRobot Create, but it doesn't automatically subscribe to cmd_vel and its drive commands aren't consistent with the way Twist is defined in meters/sec and radians/sec. I couldn't find a mapping from this driver's drive command units to what the navstack was expecting, which made it impossible for the robot to navigate. So this isn't the main driver that I use But this driver still does have odometry information so it could be useful for other purposes outside of navigation, especially since it comes with a nice teleoperation GUI made with wxWidgets.
The hrl_rfid library from Georgia Tech's Healthcare Robotics Lab. This package has a driver node that allows me to communicate with the Mercury(r) 5e RFID reader and to query the environment with two antennas at once. NOTE: You will need to download the entire hrl repository (not just hrl_rfid) because there are some other tools there that hrl_rfid uses. Click here to be redirected to that repository.
The next step is to download and compile my packages, which are found in the following googlecode repository: http://code.google.com/p/dukedusty2/. Map-building and navigation are done in the createbot package.
I created a launch file in createbot/map_building called build_map.launch that needs to be configured and launched first. Configure it for your needs by tweaking the parameters which are explained here on the ROS web site. Then launch that file (roslaunch build_map.launch). It will wait for laser scans and tf transforms from odom to base_link (the odometry estimates) and then it will begin to construct a map.
Now launch my second launch file, createbot/map_buliding/explore.launch (roslaunch explore.launch), which subscribes to the laser scanner using the hokuyo_node, subscribes to the roomba using the irobot_create_2_1 driver, and subscribes to the camera using the usb_cam node. Note that I also specify the static TF transforms for the camera and the laser here (no RFID is necessary for map building).
I also launch a program that I wrote called "ObstacleAvoid" implemented in createbot/src/ObstacleAvoid.cpp. This program basically mimics the roomba's original functionality of exploring open space while trying to avoid obstacles. It is possible to override the automatic drive commands by executing another program I made in createbot/navigate/manualdrive, which accepts basic teleoperation commands. Press the space bar and ENTER to toggle between manual and automatic drive mode once this program is launched. Use WASD controls (plus ENTER) to make the robot go forward, left, backward, and right. This way, the user can let the robot go automatically for a while exploring open space, but then redirect it manually to a new area. Manual teleoperation is also obviously useful for helping the robot to avoid obstacles that the laser scanner cannot see
Here's a video of the roomba running explore.launch using the automatic program ObstacleAvoid.cpp (no user intervention):
Once build_map.launch and explore.launch have been launched in that order, it's time to use RVIZ to visualize what's happening. Type rosrun rviz rviz, and open the RVIZ configuration file createbot/map_building/slam_rviz.vcg. I set it up so that laser scans are overlayed on top of the map
On the left there is a panel displaying real-time input from the camera. On the right, the map-building in progress is visible with the laser scans being drawn in white on top for reference.
If you try to do online SLAM, you may be disappointed with the results of the map. This is because the processor can't build the map at full efficiency and navigate at the same time. When I actually cared about accuracy with the maps, I built them offline after taking data. This tutorial explains how to do this with a "bag file" (ROS log file for laser scans and TF odometry). Basically do the same exact thing as online map-building except save step 1 (the map buliding launch file) for later when playing back the data. I also generally choose to play the data back more slowly so the processor has a chance to process all of the particles (rosbag play -r rate logfile.bag, where "rate" is the fraction of the speed at which to play back logfile information, I often used 0.25 to play back at quarter speed).
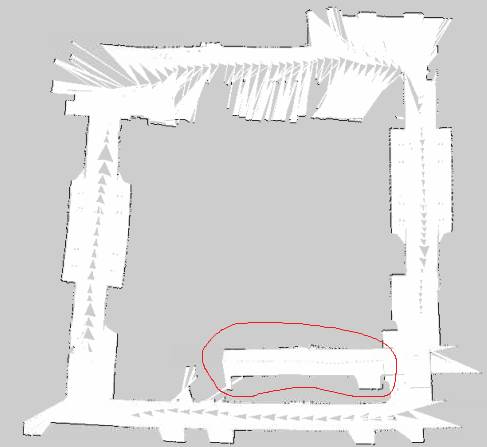
Here are some results that I got:
A map of my apartment in central campus Duke. The gaps in the common room (biggest room on the right) are due to couches and chairs sitting there
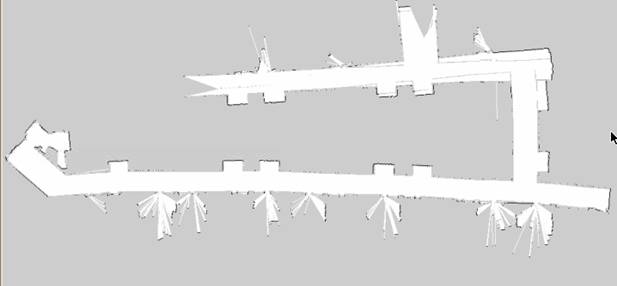
A map of my the hallway outside of our lab in the Duke Fitzpatrick building.
A map of my the hallway outside of our lab in the Duke Fitzpatrick building. This time I tried to drive it around and do loop closure, which wasn't perfect here because of the large drift of the odometer readings and the glass in the upper side of the rectangle (that made it difficult for the laser scanner)
A map of a much larger section of the Fitzpatrick Hallway that shows the results of compounded odometry drift over time (the sides should be straight).
Overall the results aren't bad, and they can be improved even more if the map building is done offline on a fast computer (I'll post those results here once I extract the files from my broken laptop).
Update 6/21/2011 My deepest apologies to those who tried to use the tutorial before this date, it seems like there was a mistake that went undiscovered for months. Apparently I accidentally left behind an identity transformation between /map and /base_link in the navigate_robot_setup.launch file, which would lead to a contradiction if the AMCL node was trying to come up with its own transformation between /map and /base_link. This transformation has been removed now and everything should work now. Many thanks to the people in the ROS community who discovered this error.
Follow these steps to do global navigation:
Execute the launch file I created in createbot/navigate/navigate_robot_setup.launch. This launch file starts driver nodes for the Hokuyo laser and the roomba, and it sets up the static TF transform tree that I explained before
Now execute the launch file I created in createbot/navigate/move_base_navigate.launch. This launch file starts a node for the map, a node that does Adaptive Monte Carlo Localization (AMCL), and a move_base node that does path planning based on the parameters that were set in step 1
Once both of those launch files have finished initializing, launch rviz (rosrun rviz rviz) and open my RVIZ configuration file in createbot/navigate/navigate_rviz.vcg. This configuration file sets up panels in rviz that display the map, path planning information, local obstacles, and other useful navigation visualization tools. It also provides the ability to select locations/orientations on the map as goals for the robot to reach. I created this configuration file following a video tutorial on ROS's web site. Watch that video to see how to command the robot to navigate using RVIZ.
Here is a video I made showing my experiences with the navigation stack:
This video is a bit laggy because there was a lot that the processor had to deal with as it was taking this video
Just as before with mapping, the left panel displays real-time input from the camera, and the right shows the map
At :10, I select an initial 2D pose estimate of the robot with respect to the map. A bunch of purple arrows are drawn around there, which represent the particles in the AMCL filter that's maintained over the robot pose. The purple arrows are redrawn as adaptive resampling takes place with new inputs and elapsing time
At :14 I select a navigation goal, and a global path (drawn in green) is calculated
At 0:48 I stepped in front of the robot and it was able to find a local path around to avoid hitting into me. At 1:04 someone stepped out of an office with a bike and the same local obstacle-avoidance behavior was demonstrated successfuly.
All throughout the video red dots are drawn where laser scans detect obstacles, and blue circles are drawn around as "inflated obstacles," whre the center of the robot should never intersect to avoid hitting things